Mixed Reality with VIROO
VIROO Studio provides a way to feed Mixed Reality content to different headsets.
To generate a Mixed Reality content, you make a composition of the 3D content over the Passthrough image provided by the Headset cameras. The 3D generated frame buffer will be multiplied with the camera image using Alpha channel. The image from the cameras will be visible in areas where the Unity generated 3D frame buffer is transparent. The image will be hidden by 3D objects where they're opaque.
The trick is to use a camera which renders a transparent background using Full Black and Transparent Color (0,0,0,0) as Clearing method (instead of a Skybox).
Note
Please note that in case you are publishing an application for VIROO standalone, you have to follow also the steps indicated in Standalone-Support.
The configuration required in your project varies depending on the platform you are targeting and requires you to add vendor-specific packages. Please refer to the configuration details below for each platform.
Meta
These are the basic steps to configure your project for passthrough in Meta standalone devices. For more information please refer to Meta documentation.
To enable Passthrough for Meta headsets, you need to have the Unity OpenXR Meta plug-in installed. To do this go to Window -> Package Manager and install the latest version.
Note
Meta only provides passthrough for standalone built applications. You can iterate on your application by testing the passthrough from the editor. For more information on this, please refer to the official documentation.
Go to Edit -> ProjectSettings -> XR Plug-In Management -> Plug-in providers and enable Meta Quest feature group.
Note
This documentation was written using version 2.3.0 of the Unity OpenXR Meta package.
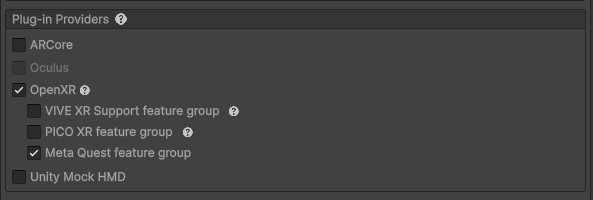
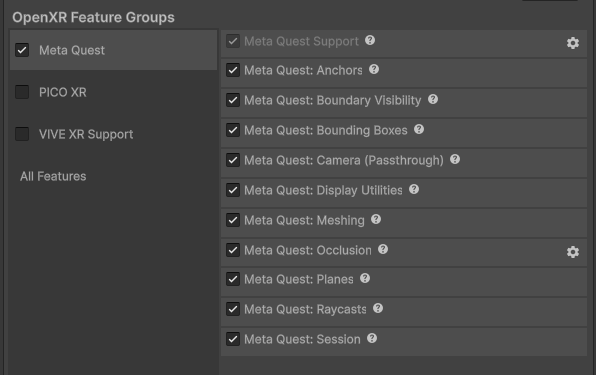
By default you will have all Meta Quest features enabled when you do this. Make sure you don't have any other provider's plug-in enabled.
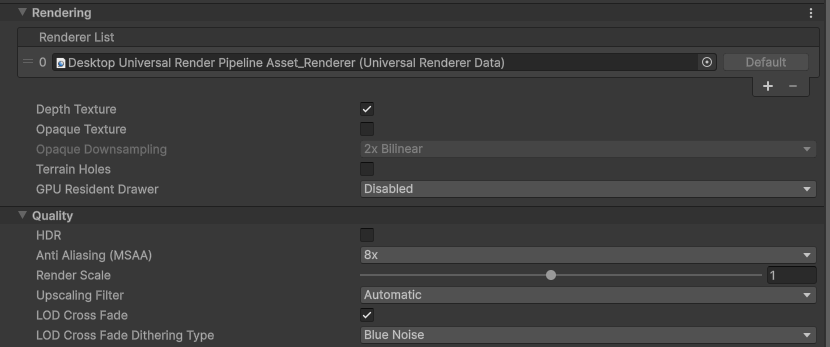
Locate your Universal Render Pipeline Asset and select it. In the inspector, under Rendering disable the Terrain Holes option, under Quality disable the HDR option and under Post-processing enable Alpha Processing option.

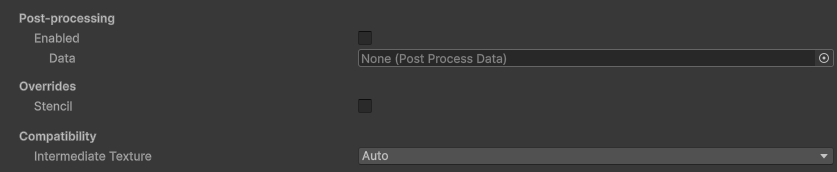
Locate your Universal Renderer Data and select it. In the inspector, under Post-processing disable the Enabled option and under Compatibility leave the Intermediate Texture option set to Auto.
The Main Camera must have the ARCameraManager component for the passthrough to work. This component has to be disabled when passthrough is deactivated and enabled when you activate it.
using UnityEngine;
using UnityEngine.XR.ARFoundation;

public class MetaMR : MonoBehaviour
{
    [SerializeField]
    private GameObject hideInMR = default!;

    [SerializeField]
    private bool inMR = false;

    private ARCameraManager cameraManager;
    private Camera? cam;
    private Color savedColor;
    private CameraClearFlags savedClearFlags;

    protected void Inject(IContextProvider contextProvider)
    {
        cam = contextProvider.VirooCamera!.OriginalCamera;
        savedColor = cam.backgroundColor;
        savedClearFlags = cam.clearFlags;

        cameraManager = cam.gameObject.AddComponent<ARCameraManager>();
        cameraManager.enabled = false;

        if (inMR)
        {
            ShowPassthroughUnderlay();
        }
    }

    void Start()
    {
        this.QueueForInject();
    }

    public void ToggleMixedReality()
    {
        if (inMR)
        {
            HidePassthroughUnderlay();
        }
        else
        {
            ShowPassthroughUnderlay();
        }
    }

    void ShowPassthroughUnderlay()
    {
        cam!.clearFlags = CameraClearFlags.SolidColor;
        cam!.backgroundColor = Color.white * 0;

        hideInMR.SetActive(false);

        cameraManager.enabled = true;

        inMR = true;
    }

    void HidePassthroughUnderlay()
    {
        cam!.clearFlags = savedClearFlags;
        cam.backgroundColor = savedColor;

        hideInMR.SetActive(true);

        cameraManager.enabled = false;

        inMR = false;
    }
}
PICO
These are the basic steps to configure your project for passthrough in PICO standalone devices. For more information please refer to PICO documentation.
Note
Pico only supports Passthrough on Android devices.
You have to install PICO Unity OpenXR SDK, to do this you have to follow the steps indicated at Standalone-Support in the PICO section.
Note
This documentation was written using version 1.4.0 of the PICO Unity OpenXR SDK.
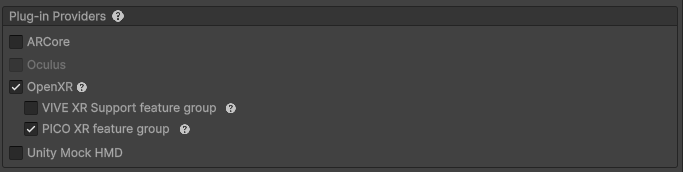
Go to Edit -> ProjectSettings -> XR Plug-In Management -> Plug-in providers and enable PICO XR feature group.
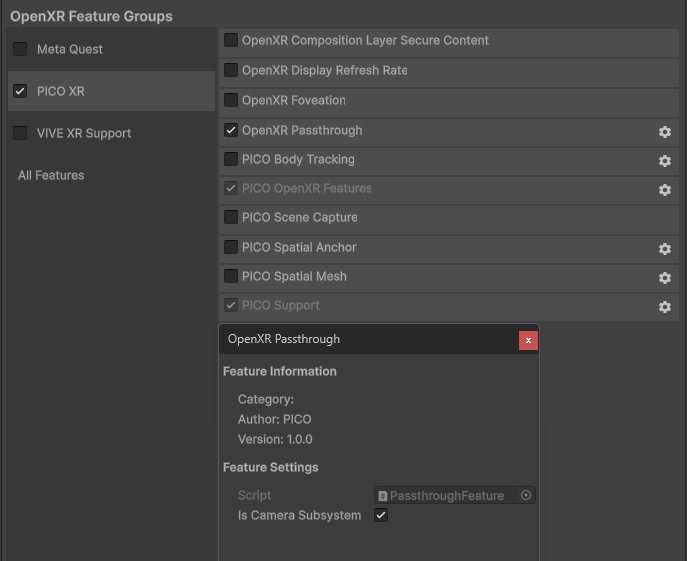
Then go to Edit -> ProjectSettings -> XR Plug-in Management -> OpenXR, in the OpenXR Feature Groups -> PICO XR section make sure to enable the OpenXR Passthrough option. Make sure you don't have any other provider's plug-in enabled.
Locate your Universal Render Pipeline Asset and select it. In the inspector, under Rendering disable the Terrain Holes option, under Quality disable the HDR option and under Post-processing enable Alpha Processing option.
Locate your Universal Renderer Data and select it. In the inspector, under Post-processing disable the Enabled option and under Compatibility leave the Intermediate Texture option set to Auto.
To enable passthrough create a script of type Mono Behaviour in the scene and call to the PassthroughFeature. Here is an example of how to do that.
using Unity.XR.OpenXR.Features.PICOSupport;

public class PicoMR : MonoBehaviour
{
    [SerializeField]
    private GameObject hideInMR = default!;

    [SerializeField]
    private bool inMR = false;

    private Camera? cam;
    private Color savedColor;
    private CameraClearFlags savedClearFlags;

    protected void Inject(IContextProvider contextProvider)
    {
        cam = contextProvider.VirooCamera!.OriginalCamera;
        savedColor = cam.backgroundColor;
        savedClearFlags = cam.clearFlags;


        if (inMR)
        {
            ShowPassthroughUnderlay();
        }
    }

    void Start()
    {
        this.QueueForInject();
    }

    public void ToggleMixedReality()
    {
        if (inMR)
        {
            HidePassthroughUnderlay();
        }
        else
        {
            ShowPassthroughUnderlay();
        }
    }

    void ShowPassthroughUnderlay()
    {
        cam!.clearFlags = CameraClearFlags.SolidColor;
        cam!.backgroundColor = Color.white * 0;

        hideInMR.SetActive(false);

        PassthroughFeature.EnableSeeThroughManual(true);

        inMR = true;
    }

    void HidePassthroughUnderlay()
    {
        cam!.clearFlags = savedClearFlags;
        cam.backgroundColor = savedColor;

        hideInMR.SetActive(true);

        PassthroughFeature.EnableSeeThroughManual(false);

        inMR = false;
    }
}
HTC
These are the basic steps to configure your project for passthrough in HTC standalone devices. For more information please refer to VIVE documentation.
First of all you have to install VIVE OpenXR Plugin, it has to be version 2.0.0 or higher. To do this go to Window -> Package Manager and install the latest version.
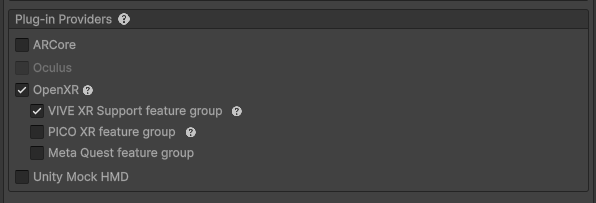
Go to Edit -> ProjectSettings -> XR Plug-In Management -> Plug-in providers and enable VIVE XR Support feature group.
Note
This documentation was written using version 2.5.1 of the VIVE OpenXR Plugin.
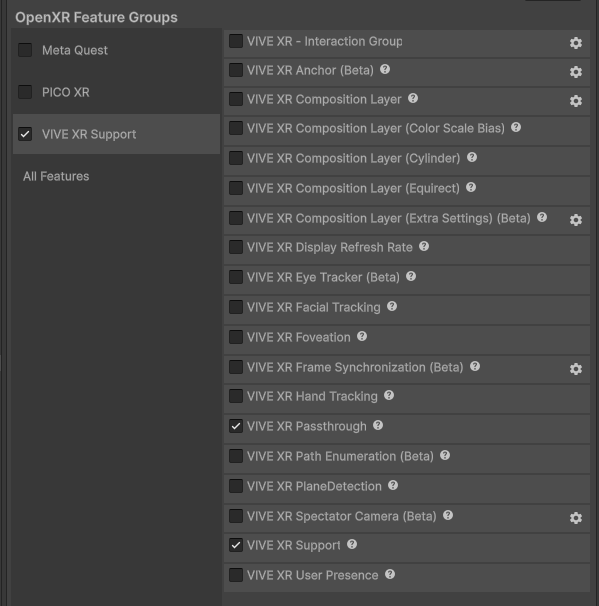
Then go to Edit -> ProjectSettings -> XR Plug-in Management -> OpenXR, in the OpenXR Feature Groups -> VIVE XR Support section make sure to enable the VIVE XR Passthrough option. Make sure you don't have any other provider's plug-in enabled.
Locate your Universal Render Pipeline Asset and select it. In the inspector, under Post-processing enable Alpha Processing option.
To create a Planar Passthrough create a script of type Mono Behaviour in the scene and call PassthroughAPI in the Start().
using UnityEngine;
using VIVE.OpenXR;
using VIVE.OpenXR.CompositionLayer;
using VIVE.OpenXR.Passthrough;

public class ViveMR : MonoBehaviour
{
    [SerializeField]
    private GameObject hideInMR = default!;

    [SerializeField]
    private bool inMR = false;

    private Camera? cam;
    private Color savedColor;
    private CameraClearFlags savedClearFlags;

    protected void Inject(IContextProvider contextProvider)
    {
        cam = contextProvider.VirooCamera!.OriginalCamera;
        savedColor = cam.backgroundColor;
        savedClearFlags = cam.clearFlags;

        XrResult result = PassthroughAPI.CreatePlanarPassthrough(
            out VIVE.OpenXR.Passthrough.XrPassthroughHTC passthrough,
            LayerType.Underlay,
            onDestroyPassthroughSessionHandler: null,
            alpha: 1f,
            compositionDepth: 0u
        );

        if (!result.Equals(XrResult.XR_SUCCESS))
        {
            Debug.Log("PASSTHROUGH NOT CREATED");
        }

        if (inMR)
        {
            ShowPassthroughUnderlay();
        }
    }

    void Start()
    {
        this.QueueForInject();
    }

    public void ToggleMixedReality()
    {
        if (inMR)
        {
            HidePassthroughUnderlay();
        }
        else
        {
            ShowPassthroughUnderlay();
        }
    }

    void ShowPassthroughUnderlay()
    {
        cam!.clearFlags = CameraClearFlags.SolidColor;
        cam!.backgroundColor = Color.white * 0;

        hideInMR.SetActive(false);

        inMR = true;
    }

    void HidePassthroughUnderlay()
    {
        cam!.clearFlags = savedClearFlags;
        cam.backgroundColor = savedColor;

        hideInMR.SetActive(true);

        inMR = false;
    }
}