Adding content to your VIROO Application
A VIROO Application consist of one or several VIROO scenes. A VIROO scene is a Unity scene with some components that must be in the scene so that they work in VIROO.
Adding content to a VIROO Application starts by creating a Unity scene.
Create a new Unity scene with VIROO Components
A VIROO scene requires a minimum number of components to work. To create your scene you can:
- Create the scene from the template provided by VIROO Studio.
- Or, add VIROO support to an existing scene manually.
Create a new scene from the template
The easiest way to create an scene for a VIROO Application is to use the template provided by VIROO Studio. To do so:
- In Unity, go to
File -> New Scene. - Select the
VIROO Studiotemplate and click onCreate.
Save the scene you just created. It contains the minimum components for your VIROO Application scene.
Add VIROO support to an existing scene manually
If you have created your scene manually, or are integrating VIROO into a previously existing scene, you must follow these steps.
So, as a first step, create a new scene in your project or open the scene you want to include VIROO support into.

You must delete the camera. When you run a scene (in the Editor or Player), the VIROO framework takes care of creating the camera (and the complete XR Rig).
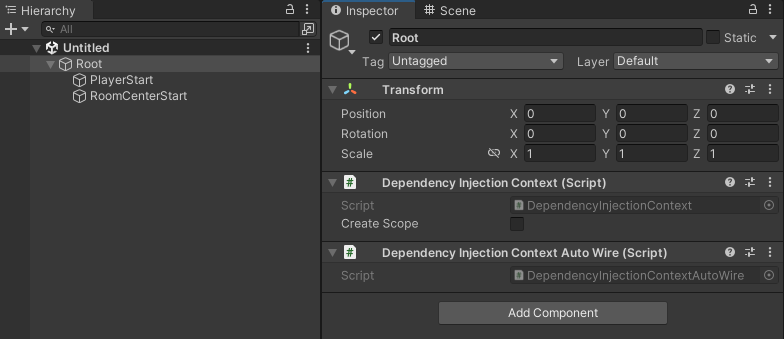
VIROO scenes must have a Root GameObject in the scene. All elements of the scene should be inside its hierarchy. This GameObject must contain DependencyInjectionContext and DependencyInjectionContextAutowire components.
It is not necessary to create this object manually, it can be created automatically from the template provided by VIROO Studio:
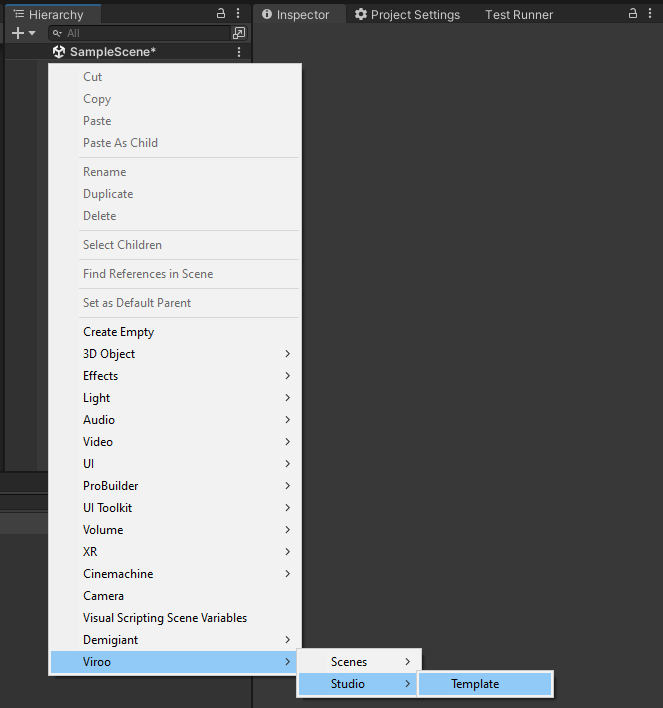
- Right click on the
Hierarchypanel to bring up the object creation menu. - Click on
Viroo -> Studio -> Template.
The template also adds GameObjects with the PlayerStart and RoomCenterStart components. This will be the point at which users will spawn when using this scene.


Add your own content
Now you are ready to compose the scene with the 3D elements you want. You can use your own 3D models or get them from third-party stores (such as Unity Asset Store) to make the environment look according to your needs.
All the content you add must be added into the Root GameObject hierarchy.
To add interaction easily, the recommended way is to use the VIROO Interaction System. This will allow you to add interaction to the scene in a simple way, with the most common types of interaction in VR. You will also be able to make these interactions trigger logic in your scene, such as moving objects, playing animated sounds, playing videos, teleporting users, etc...
Go to the next section, Validating your VIROO Application, to see how you can validate your VIROO Studio project.
Set your scene to be published
In order for your scene to be published when you publish your VIROO Application, you must add it to the Application Publisher scene list.
You can open the Application Publisher window by going to Window -> Viroo -> Application Publisher.
In this window you must add the Unity scenes that will be part of your VIROO Application. How to configure the scenes in more detail and how to publish your application is explained later in Publishing your VIROO Application.