Table of Contents

Publishing your VIROO Application

The experience of publishing content to VIROO is similar to publishing a traditional Unity project executable.

When you develop a VIROO Application, it can be composed of one or several scenes.

Configuration in Unity

You need to make the following adjustments to your Unity project in order to publish your VIROO Application.

Add VIROO Main scene

When publishing VIROO Application, the runtime, VIROO Main, must be included in the application. To do so, the following steps must be followed:

  1. In Unity, go to File -> New Scene. Select the VIROO Main template and click on Create.
  2. Save the scene (File -> Save).
  3. Go to File -> Build settings... and add the scene you just created to the Scenes in Build list, in the first position (index 0).
Note

The scenes that you include in your application do not need to be added to this list, when you publish the application VIROO Studio will take care of including them in the build.

Configure the Application ID

Your application needs to have a unique identifier to function correctly on the VIROO platform.

To set the ID of your application:

  1. In Unity, go to Edit -> Project Settings -> Viroo.
  2. Set your application identifier in the Application Identifier field.

Configure the Application Title

Your application must have a title that allows you to identify it correctly when using it.

To set your application title:

  1. In Unity, go to Edit -> Project Settings -> Player.
  2. Set your application title in the Product Name field.

Configure Vivox

If you do not want to use Vivox you have to open the scene created earlier with the VIROO Main Template and disable the prefab called VirooVivoxVoiceCommunication and save the changes.

disable-vivox.png

If you want to use Vivox you must follow the steps below:

  1. Open Edit -> Project Settings -> Services -> Vivox and follow the steps to link a project from the Unity Dashboard.

  2. Create a file named appsettings.json in Assets/StreamingAssets with the following content:

{
    "Vivox": {
        "Server": "",
        "Domain": "",
        "TokenIssuer": "",
        "TokenKey": ""
    }
}

To get the credentials:

  1. Go to Unity Dashboard.
  2. Select the appropriate project (or create a new one).
  3. Go to Services -> Vivox Voice and Text Chat -> Credentials.

Publish your VIROO Application

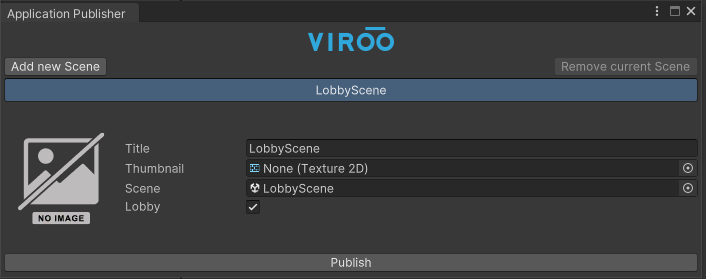
You can open the Application Publisher window going to Window -> Viroo -> Application Publisher.

In this window you must add the Unity scenes that will be part of your VIROO Application. By default, it will display one scene and you can either add more scenes by clicking Add new Scene or remove existing scenes by selecting the scene you want to remove and clicking Remove current Scene.

For each of the scenes you will have to provide the following fields:

Field Description
Title This will appear in the scene selection menu inside players.
Thumbnail This image appear in the scene selection menu inside players. This field is optional.
Scene The Unity scene containing the VIROO Scene.
Lobby You must check which of your scenes will act as Lobby, the first scene to be displayed when this application is run.

You can publish your VIROO Application by clicking on Publish.

When the Unity publishing process is finished, a Unity executable will be generated compressed in zip format. This executable cannot be executed in the traditional way, it must be uploaded to the content portal and executed from the VIROO Players of the VIROO Platform.

application-publishing.png