Setting Localization
This section explains how to configure the languages available for your VIROO Application, as well as how to set the initial language.
Setting available languages in a scene
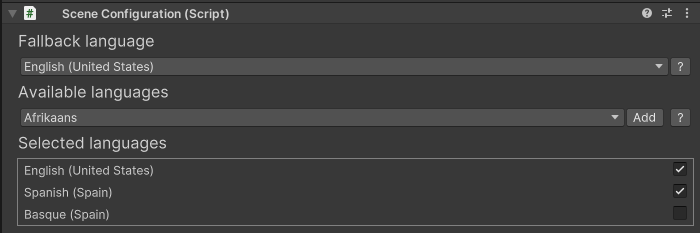
Start by adding the SceneConfiguration component to your scene. This component allow you to add supported languages to your scene, setting which of those languages may be selected to be set as the current scene language and a fallback language, for situations where you try to set by code a language that has not been added to the Selected Languages list.
This configuration affects the current Unity scene, and therefore, different scenes may have different language configurations.
| SceneConfiguration | |
|---|---|
| Property | Usage |
| Fallback language | This is the language that will be set when VIROO's localization system tries to set a not defined language. This dropdown's values are taken from the enabled Selected languages property. |
| Available languages | This dropdown shows all the available languages in .Net's CultureInfo class. After selecting a language in the dropdown, you must press the Add button to add it to the Selected languages list. |
| Selected languages | This list shows the languages that have been added to the SceneConfiguration. These languages may be enabled or disabled using the checkbox. Only enabled languages will be set as the scene's languages. |
This component does not allow to delete Selected languages through this component's UI directly to avoid removing configured localized elements in the scene (since removing a language should trigger removing all localized texts, GameObjects...).
Instead of that, a language may be disabled unchecking its checkbox. Disabled languages act as if they were not added to the list, but allow users to enable them in the future. This allows having localized contents in the scene even if the language is not active.
If you want to permanently remove a language from this list, you may set Unity's Inspectors mode to Debug to remove the entry from the Selected languages list.
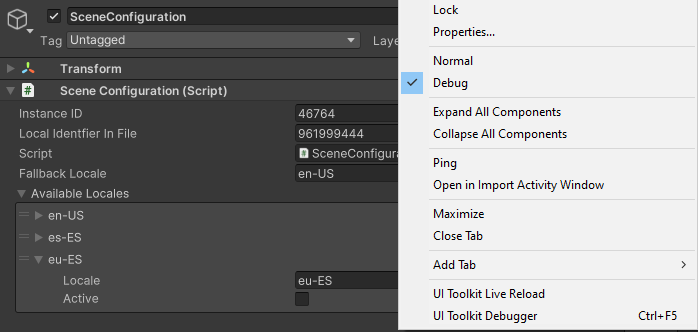
Take into account that if you remove one of VIROO's core languages, it will be restored when you exit the Debug view.
If no custom localization is provided in a scene, VIROO supports English, Spanish and Basque by default.
Setting the initial scene language in the editor
As previously mentioned, the current language may be set at runtime using both Actions and custom code. The initial language of the application is provided by VIROO Single Player and VIROO Room Player.
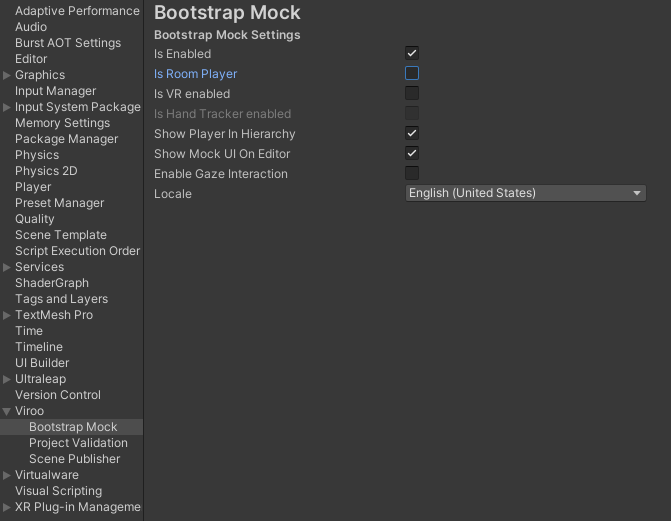
If you want to simulate this behaviour, where either VIROO Single Player or VIROO Room Player provide an initial language, you may use VIROO mock settings inside Unity's Project Settings. In this case, you will be able to set the initial language to one of VIROO's core language (since these are Project settings, the languages defined in a scene cannot be selected from this interface).
In order to set a scene defined language as the current language you can try one of the following options:
Using VIROO mock settings
- Go to
Edit -> Project Settings -> Viroo -> Bootstrap Mock. - Choose one of the available languages in the Locale dropdown.
- In the
SceneConfigurationcomponent disable the language you just set in the mock settings. - Set your desired language as the
Fallback languageinSceneConfiguration.
Note
Remember to restore the fallback language and enabled languages when publishing the application if this is just a workaround to set your desired language as the initial language in the Editor.
Using custom code
- Add a custom script to your scene that subscribes to the
ISceneLocalizationService.OnInitialized - Set
ILocalizationService.CurrentCultureto the desired language when theISceneLocalizationService.OnInitializedis triggered.
Note
Remember to remove this script when publishing the application if this is just a workaround to set your desired language as the initial language in the Editor.
You may find more information about using custom code to access localization in Changing Localization.