Set up your Unity project
VIROO Studio requires certain specific configurations at the project level.
Validation of initial project
VIROO Validation System checks certain basic project settings such as presence of layers or tags.
Open the project validation window:
- Open
Window -> Viroo -> Project Validation. - Fix all issues. Most of them will offer you the ability to fix them automatically pressing the
Fixbutton.
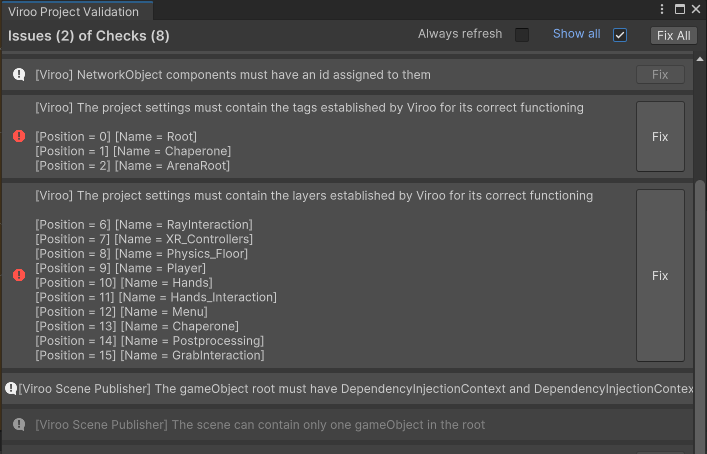
After completing this step, your project settings will be modified and, among others, you will have the Tags and Layers that VIROO uses.
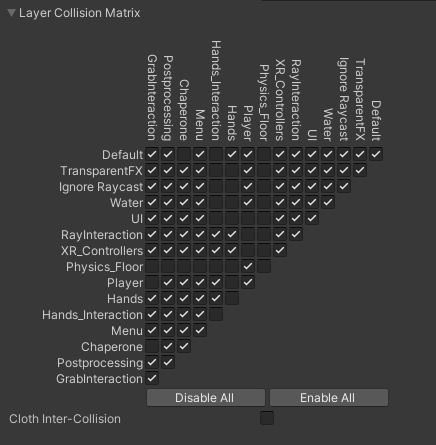
Physics
- Open
Edit -> Project Settings -> Physics -> Layer Collision Matrix. - Leave the matrix as in the image:
TextMesh Pro
- Open
Edit -> Project Settings -> TextMesh Pro. - Click on
Import TMP Essentials.
Quality
- Open
Edit -> Project Settings -> Quality. - Select
Ultra.
OpenXR
- Open
Edit -> Project Settings -> XR Plug-in Management. - Select
OpenXRunderPlugin-in Providers. - Open
Edit -> Project Settings -> XR Plug-in Management -> OpenXR. - Change
Render ModetoMulti-pass. - Select the appropriate
Interaction ProfilesandOpenXR Feature Groups. - Open
Edit -> Project Settings -> XR Plug-in Management -> Project Validation. - Fix pending errors.
More information: https://docs.unity3d.com/Packages/com.unity.xr.openxr@latest/
Mock settings
In order to be able to iterate more quickly in the development of a scene from the Unity editor, certain settings are available that allow testing in VR mode, in a specific language, etc.
This menu is accessed from Edit -> Project Settings -> Viroo -> Bootstrap Mock.